If you’re a beginner in watercolor painting, creating beautiful cherry blossom trees can seem intimidating.
But don’t worry! In today’s tutorial, I will guide you through every step of the process.
By breaking down the shapes, shadows, and layering techniques, we’ll turn those delicate pink blooms into stunning art.
So grab your paints, and let’s get started!


Contents
- 1 Materials Needed for Painting Cherry Blossom Trees
- 2 Step-by-Step Guide to Painting Cherry Blossom Trees
- 2.1 Step 1: Study the Reference Photo and Break it Down
- 2.2 Step 2: Study the Shadows and Light
- 2.3 Step 3: Sketching the Tree Trunks and Branches
- 2.4 Step 4: Lightly Sketch the Tree Shapes and Trunks
- 2.5 Step 5: Painting the Cherry Blossoms
- 2.6 Step 6: Layering & Adding Detail to the Cherry Blossoms
- 2.7 Step 7: Painting the Tree Trunks and Branches
- 2.8 Step 8: Add Final Touches and Splatter Effects for a Vibrant Finish
- 3 In A Nutshell
Materials Needed for Painting Cherry Blossom Trees
Before we dive into the painting process, let’s go over the materials you’ll need.
1. Watercolor Paints
When it comes to colors, cherry blossoms are usually painted with a mix of soft pinks and earthier shades for depth.
I suggest having a few colors on hand to give your painting variety. Here’s what I recommend:
- Pinks: These are the base colors for the blossoms, so make sure you have a variety of pinks to choose from. You can use Alizarin Crimson, a bright red pink, to add vibrancy.
- Browns: For the tree trunks and darker shades in the petals, umber brown and sepia will work great. These will add warmth to the painting.
- Whites and Purples: A little white can help highlight specific areas, and purple can be used to add depth to your cherry blossoms.
- Yellow (optional): If you want to add some brightness and contrast, yellow can be a fun addition, especially for areas that catch the sunlight.
2. Brushes
I recommend using a size 8 round brush for most of the work. This brush is perfect for making both delicate strokes and larger, more expressive ones.
Additionally, using smaller brushes will allow you to capture fine details, like smaller branches.
3. Paper and Other Tools
For best results, use good-quality watercolor paper. It should be thick enough to handle multiple layers of paint without warping.
You might also want a clean, soft eraser for lightening up any sketch marks that are too dark.
Step-by-Step Guide to Painting Cherry Blossom Trees
Now that you’ve got your materials ready, let’s jump into the actual process of painting these gorgeous trees.
Step 1: Study the Reference Photo and Break it Down

When I first started painting trees, I found it challenging to get the shapes and shadows right.
It took a lot of practice, but I learned that breaking down the tree into parts helped a lot.
So, let’s begin by studying a reference photo. Today, I’ve chosen a cherry blossom tree, perfect for spring.
The first thing I do is look at the structure of the tree. In our case, the tree is divided into several bunches of flowers, which I’ll group into 4 sections:
- One large bunch at the bottom.
- Two mid-sized bunches of flowers.
- One tiny bunch towards the top.

I begin by sketching out the basic shapes of the clusters.
The blossoms in the photo have a somewhat rectangular shape, starting narrow on the right side and widening as they move left.
As I sketch, I make sure to note the gaps between the clusters of flowers.
These small details are essential when I start painting, as they will help create the natural flow of the tree.

Step 2: Study the Shadows and Light

Now that I have the basic shapes down, I’ll focus on studying the shadows in the photo.
Shadows are essential in adding depth and realism to your painting.
In the reference photo, the light is coming from the top left, which means the shadows will fall on the right side of the tree.
Note where the shadows are darkest and where the light hits the flowers.
I can see darker areas on the bottom of the branches and some of the flowers. This is helpful when I start layering the paint to build contrast.
The general rule to follow is: if the light is coming from the top left, the shadows will be on the bottom right.
Remember to incorporate this when you start painting, as it will create a more realistic effect.
Step 3: Sketching the Tree Trunks and Branches

Once the shapes and shadows are established, it’s time to sketch the tree trunks.
I like to use a different color, such as pink, to distinguish the trunks from the blossoms.
Notice how the tree trunks aren’t perfectly straight – they curve and bend naturally, which is key to making the tree look realistic.
I start by drawing the central trunks, which are thicker and have gentle curves.
The smaller branches will branch off from these trunks. When sketching, it’s helpful to visualize how the trunks and branches connect with each other.
This makes it easier to see where the flowers will go and how the tree will naturally flow.
As you sketch, pay attention to the thickness of the trunks and branches.
The closest tree trunk to you will appear the thickest, while the ones in the background will be thinner.
This creates depth and perspective in your painting.
Feel free to add extra details, like smaller branches or twigs, but avoid overdoing it at this stage.
Step 4: Lightly Sketch the Tree Shapes and Trunks

To give your watercolor cherry blossom trees a natural structure, begin by lightly sketching the overall shapes of the trees with a pencil.
Keep the outlines loose and organic—similar to how we blocked out the earlier trees.
Next, lightly indicate the tree trunks. These don’t need to be detailed; just a brief placement suggestion will help anchor your composition.
Be sure to sketch very lightly to avoid the pencil lines showing through your watercolor.
If needed, use an eraser to dab and lift any darker areas gently. This step helps guide your watercolor strokes while maintaining a clean and delicate finish in the final painting.

Step 5: Painting the Cherry Blossoms
Now that we’ve got the basic shapes down, it’s time to bring our cherry blossoms to life with color! Here’s how you can create delicate, layered blooms using watercolor.
Mixing Colors & Preparing Your Brush

Let’s start by mixing some pinks. I’m using Alizarin Crimson for the vibrant red tones, which will bring our blossoms to life.
Grab a size 8 brush—it’s perfect for making both small and larger strokes.
Start from the top of the tree, where the outer flowers are. Use the tip of your brush to create tiny, delicate strokes.
I like to draw lines in multiple directions—left, right, up, and down—this adds a natural scattering effect to the petals.
Adding Layers & Building Depth

As you move inward toward the center of the blossoms, gently press more on the belly of your brush to create thicker strokes.
Notice how the lines start getting wider as we move deeper. It’s all about varying the pressure to achieve different stroke sizes.
Leave lots of white space between the strokes in the beginning, but as you move towards the center and the blossoms become more crowded, reduce the white gaps.
Don’t worry too much about making it perfect; the more random, the better it’ll look!
Incorporating Shadows & Depth

Once you’ve finished the first bunch, let’s add some depth. We already determined where the shadows will fall earlier.
Now it’s time to go in and add a bit more pigment, particularly to the darker areas.
Since the first layer is still wet, drop in more color—this will let the hues blend beautifully, creating a soft transition.
I’ll also add a little brown (Sepia) to deepen the shadows. If you notice any harsh edges where the pigments meet, just blend them out with a clean brush.
This step helps to create a more seamless, natural flow.
Moving to the Second Bunch of Blossoms

Next, we move on to the second bunch of flowers. Again, use the same random, loose strokes.
Don’t overthink it—just let your brush do its thing! The key is to practice and enjoy the process.
To make the colors a bit lighter, feel free to wash off your brush or use less pigment.
When adding the second layer of color, use less water and more pigment for richer tones.
It’s important to work while the first layer is still wet so that the colors can connect seamlessly.
This ensures your tree doesn’t look like two separate bunches. Add a touch of brown to deepen the shadows.
Layering & Color

For beginners, I suggest sticking to just two colors—like the pink and brown—until you feel confident.
Once you get comfortable, feel free to add other colors like purple or yellow for extra depth.
Finally, when working on the third bunch, use the tip of your brush to add smaller, delicate strokes.
Leave some gaps where the tree trunks will go later.
Step 6: Layering & Adding Detail to the Cherry Blossoms
At this stage, we’ll focus on refining the shape and adding layers to bring more depth to the painting. Here’s how I go about it:
Assessing the Shape & Adjusting the Composition

Now, it’s time to take a step back and evaluate the shape of the tree.
As I look at it, the current shape feels a bit off—it’s curving in a direction that doesn’t quite match the reference photo.
So, I’ll adjust the shape, making it more natural by extending the branches downward, just like in the picture.
Don’t worry if it looks a bit funny right now! The tree might feel incomplete because we haven’t added the tree trunk yet, but once we do, it will all come together and look much more realistic.
Adding Shadows to Enhance Depth

As we continue, I like to focus on the shadows. These are crucial to making the tree feel grounded and three-dimensional.
For the hanging clusters, I’ll make sure to add shadow underneath each bunch. This step will create more contrast and help the blossoms stand out.
Building Layers for Smooth Transitions

Once the first layer dries, it acts as a base for the rest of the painting. You’ll want to add more layers on top once the initial layer is dry.
The first layer gives us that smooth background, while subsequent layers will add texture and detail.
For the second layer, I go in with a smaller brush to add finer details, like individual petals.
I focus on the areas closer to the shadows and use bigger brush strokes toward the outer edges to create variation in size. This helps bring depth and life to the blossoms.
Blending & Creating Smooth Transitions
You’ll notice there might be a harsh difference between the first and second layers. To soften that, I use a clean brush to dab off any excess water and gently blend out the edges.
This will ensure a smooth transition between the layers and give the painting a more polished and natural look.
Adding Final Details & Refining the Blossoms

With the blending done, I now go back and add more detail where I feel it’s needed.
Whether it’s adding more petals or deepening some shadows, this step is all about refining the painting to make it feel complete.
I keep blending the colors as I go, ensuring that everything flows smoothly.
Step 7: Painting the Tree Trunks and Branches
Now that our cherry blossoms are in full bloom, it’s time to anchor everything by adding in the tree trunks and branches.
Start with the Main Tree Trunk

I’m using sepia, the same rich brown shade we’ve used before. Sepia is perfect for tree trunks—it has a warm, earthy tone that pairs beautifully with the pink petals.
I always refer back to either my original sketch or a reference photo to guide where I place the trunk.
Look for gaps in your blossoms where a trunk could naturally fit. I found a nice little gap in mine, which makes the perfect spot to paint the trunk in.
Make sure the trunk has a thicker, bolder tone than the blossoms—it helps ground the composition.
To make the trunk look more organic, I use thinner lines at the top and gradually press down the brush to create thicker strokes as I move downward.
This way, it mimics how real tree trunks taper. The goal is to avoid stiff, straight lines—add a few bends and curves to give it personality!
I’ll also extend some parts of the trunk so they disappear naturally into the blossom clusters, making it look like the tree is tucked within the petals.
Painting Branches with Broken Lines

Next, I move on to the thinner branches. These are mostly painted with just the tip of my size 8 brush.
If you’re using a larger brush without a fine tip, feel free to switch to a smaller one here.
These finer branches should look light and airy, so I don’t fully connect the lines—I use broken strokes to give a delicate feel.
They peek through the blossoms and connect the tree together visually.
You’ll want to draw them so they branch out from the main trunks, creating that iconic cherry tree silhouette.
I make sure that each little branch ties back to one of the main trunks—it’s not just random lines floating around!
Adding Depth with Contrast

To make the tree trunks more dimensional, I add darker tones to the bendy parts—especially around Y-shaped intersections or curves.
This extra bit of shading brings the tree to life and gives it more character.
And if you find that any line feels a bit too harsh, just grab a clean brush, dab off the excess water, and softly blend the edge out.
This smooths the transition and keeps the texture soft and painterly.
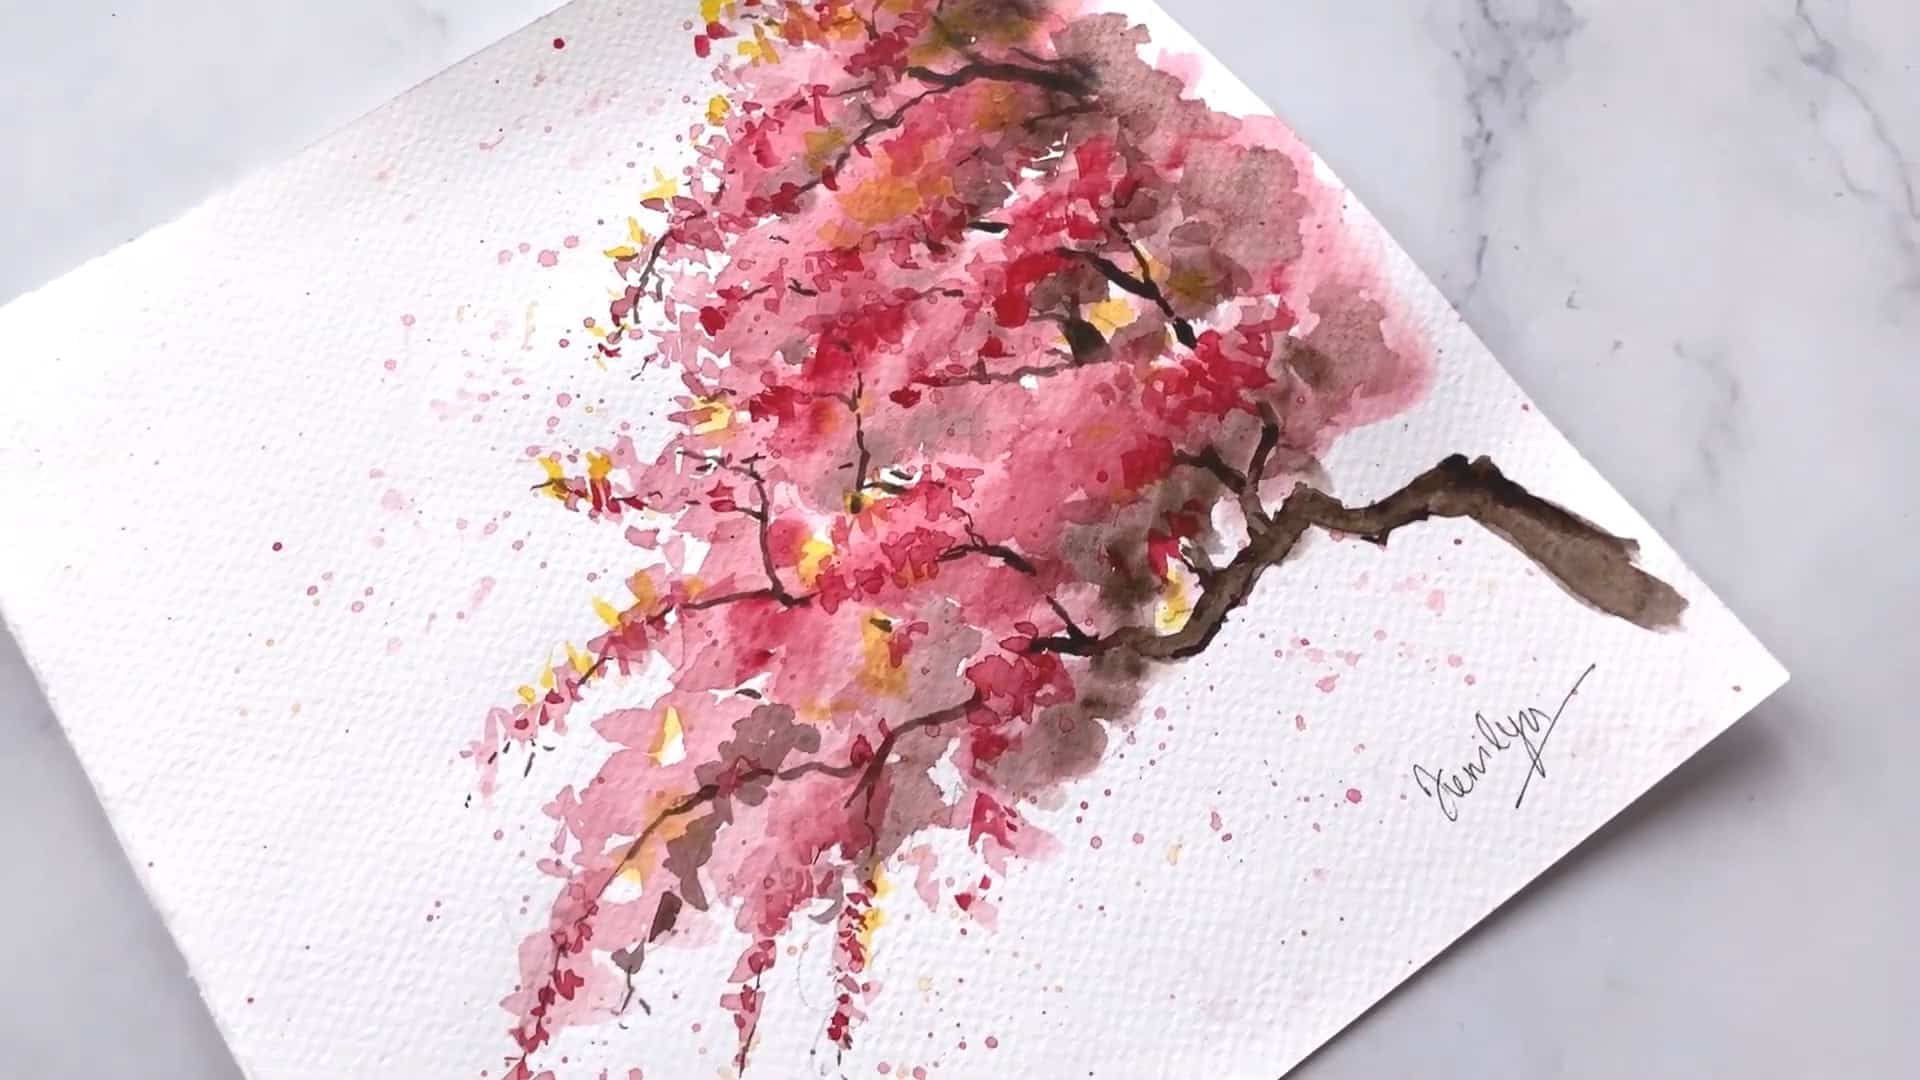
Step 8: Add Final Touches and Splatter Effects for a Vibrant Finish
We’ve made it to the final layer—this is where everything comes together and the cherry blossom tree painting really comes alive!
Fill in the Gaps with Petals for More Depth

First, I take out my Alizarin Crimson again to fill in those little gaps left around the tree trunk.
These small areas of broken lines can look a bit odd right now, but once you dab in some blossoms, it gives the illusion that the petals are layered in front of the trunk—just like in real life!
I usually add a petal cluster here and there, letting them overlap with the branches.
This trick helps push the trunk into the background and pull the blossoms forward, creating beautiful depth and dimension in the painting.
These last-minute blossoms really add texture and character, making your cherry blossom tree look more natural and full of life.
I always try to paint spontaneously and freely—your tree doesn’t have to match the reference exactly.
Step Back and Adjust What Feels Off

Once I’ve added the last blossoms, I like to stand up and take a few steps back. This gives me a clearer view of the overall shape and balance.
If there’s a big gap or an awkward space, I’ll go ahead and fill it with more petals.
And don’t worry if your painting looked strange earlier in the process—it always comes together once you’ve added the tree trunk and final petal details. Trust the process!
Optional: Add a Touch of Yellow for Warmth

If you’re feeling adventurous, here’s a fun optional step I often enjoy: add a splash of yellow!
My painting looked a little dull at this stage, so I decided to drop in some yellow paint—nothing too bold, just little hints.
I mixed up a fresh puddle of yellow, and then added soft dabs here and there, especially around the outer edges and in shadowy spots.
It mimics sunlight filtering through the petals, giving the tree a warm, glowing feel.
Add a Gentle Splatter Effect

For the finishing touch, I love adding a splatter effect! I simply water down some pigment (both red and yellow) and tap my brush over the paper to create tiny dots of paint.
In A Nutshell
And there you have it—your cherry blossom tree in watercolor! While it might seem tricky at first, you’ll gain more confidence and skills to add beautiful details with practice.
Don’t worry if your painting doesn’t look exactly like the reference photo; each tree will have its character.
So, grab your brush, start painting, and let your creativity flow! Want to share your cherry blossom painting?
Drop a comment below—I’d love to see your work!